The White Rim Trail has become a late fall tradition in my cycling seasons over the past few years. I've always done the 103 mile loop as a self-supported, one day push either with friends or alone. This year I thought instead of riding myself, I thought I'd share the experience with others by putting together a supported trip over 4 days through Phoenix Mulitsport. My truck will be one of 3 support vehicles for about 20 people. The custom rack I built when I bought the Tacoma has been in need of love for some time - the time has come.
My truck will be required to carry up to 9 bikes, 1 hang glider, 2 big tubs of gear, 2 water containers, 3 propane containers, 1 propane burner, 1 portable toilet, 1 wheel chair, 1 five gallon gas canister, plus Jo's and my riding gear. If you know where to look, Boulder is plentiful with cheap used outdoor gear. I see no reason to pay retail for rack parts, especially if they are going on a 200,000 mile truck. After a few weeks of collecting this is what I came up with.
My truck will be required to carry up to 9 bikes, 1 hang glider, 2 big tubs of gear, 2 water containers, 3 propane containers, 1 propane burner, 1 portable toilet, 1 wheel chair, 1 five gallon gas canister, plus Jo's and my riding gear. If you know where to look, Boulder is plentiful with cheap used outdoor gear. I see no reason to pay retail for rack parts, especially if they are going on a 200,000 mile truck. After a few weeks of collecting this is what I came up with.

The first order of business was to remove the detachable bike / kayak rack I had mounted to the hang glider rack and take it apart. Then I had to strip the 2" thick PVC tape wrapped padding off the stock Can Back bars which made up the rear hang glider rack. I mounted my long bars permanently below the silver Can Back Bars. This would be a platform to mount different bike and kayak configurations on in the future. I mounted the long bars below with U bolts so I'd have the full length of the Can Back bars to stack hang gliders on. I used stainless steel hardware with caps to prevent the bolt ends from the canvas.
Next I re-padded and taped the Can Back bars with 2" of foam. PVC pipe wrap tape is expensive, but it's the best material to cover foam padding with. It forms a monocoque structure that is compressible, but has enough memory to return to it's original form. Taping hang glider racks is an art form that is meticulous and time consuming, but I'm happy with the result.

Next I mounted the bike trays. I have enough room for 5 trays if I stagger them in opposite directions, Tour De France style. The problem with this is that there is no room for my hang glider. Since this is most likely a one time configuration the best solution I could think of was to extend the hang gliding rack from the end of the bars. It will hang out over the road, clear of the bikes and truck below. I had 3 extra bars to do this, but need to find a way to connect them to the existing rack. More U bolts seemed like the obvious solution. The front bar, which isn't padded, was easy, but the padded rear bars were more difficult. I couldn't compress the padding enough to get the extensions snug. After scratching my head for quite a while, I decided to get "mid-evil" on the problem. That is using a mid-evil technique. I used one U bolt as a fulcrum and lashed the end of the extension to the padded bar with rope. I tested it by hanging from each bar. The extensions didn't budge, but I did wake Sugar up who was sleeping in the truck bed.
In my search for parts I scored a rare find for $16. It's bike stand head that inserts into any circular bar. It has an expansion lock that once it's in it's solid with the bar. The head is fully adjustable for finding the a good work angle on the bike. When I taped the rear bar, I left room so I could insert the bike stand.
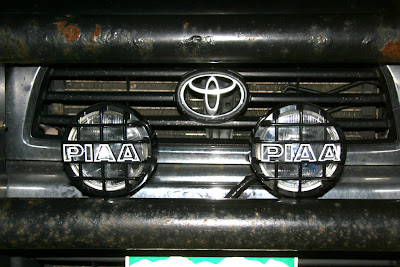
Once I the back half of the truck was in order I moved to the front. I scored a nice pair of used PIAA off road driving lights from Craig's list for $100. The Hella's I had mounted originally fell victim to rocks and broken glass years ago. The PIAA's have a metal guard that should prevent this, but their light output isn't as bright as the Hella's were.
The desert environment is a fragile one, where all life ages at very slow metabolic rates. In the interest of leaving no trace I thought I would make a portable toilet just in case anyone needs to "evacuate" between the park service outhouses. I scored a wooden toilet seat at Resource 2000, a building materials recycler, for $3. A sealable 5 gallon bucket will make up the rest. I liquid nailed (as opposed to nails or screws which would increase the possibility of splinters - Ouch!) a bracket to the bottom of the seat so it will fit securely on the bucket. Then I painted it with Kills to seal any "funk" that might have been living on the seat.
Jo gets back from her Wilderness EMT course and I finish my trip tomorrow night. After catching up, last minute packing, food shopping, dog walking, picking up bikes, more equipment, mounting the gas can, and picking up Jon and David we leave at 4:00am Friday morning.


No comments:
Post a Comment